Resources for artists

How to rescue dry watercolor tubes
Have you ever found yourself staring at dried-up paint, wondering if it's destined for the trash bin? We've all been there. It's a familiar dilemma for artists: the frustration of seeing once-vibrant colors reduced to hardened clumps.
But don’t worry! Before you say farewell to your beloved paint, I'll show you how to rescue and revive it. With a few simple steps, you can turn those clumpy colors into something usable again, saving both paint and money!
Follow this step-by-step technique
 |
 |
| 1. Does your paint tube look like this? | 2. Fill a jar with a little water, as shown here, and dip the tip of the paint tube for a day. |
 |
 |
| 3. Place the paint in the palette or pan, and use the tip of a toothpick or any other tool to remove leftover paint. Cutting the tube will make it easier. | 4. Once it’s in the palette or pan, let it dry. Spray some water to reactivate it whenever you paint. |
 |
 |
| 5. Use the remaining water to paint. | Check out the video tutorial here and paint a mini moon with me! |
I'm glad I could share these tips with you! I hope you find them useful. If you've tried rescuing your dried paint tube, please share your experiences with me—I'd love to hear from you!

Harnessing Nature's Beauty for Your Artistic Inspiration
For me, nature has always been the ultimate muse. There's something about its untouched beauty that ignites my creativity like nothing else can. It's impossible not to feel a sense of wonder and imagination wash over me every time I'm surrounded by its beauty. Whether it's the vibrant spring flowers or the delicate petals of a blossoming rose, each element of nature tells me its own unique story, waiting to be discovered.
I believe that every artist has their own way of interpreting and expressing the beauty of nature differently through various mediums and styles and these unique experiences, whether abstract or realistic, are reflected in their artwork.
 |
 |
| Ferns in Meanwhile Gardens | Green Garden, 2020 |
Stepping into nature is like stepping into a world of endless possibilities of finding inspiration for your artwork.
Sure, you can find inspiration in museums, magazines, or even on Pinterest, but there's something truly magical about spending time alone in nature. Just being present, soaking in peace and tranquillity, can spark ideas and inspire your creativity in ways you never thought possible.
How can I unlock my Creative block?
Whether you're a beginner looking to build your skills or an experienced artist in search of fresh ideas, immersing yourself in the natural world can breathe new life into your creative journey. Most importantly, if you ever find yourself going through a creativity block, my advice is simple: go outside, embrace nature, observe the smallest details like textures, colors and movements. Instead of just seeing, I would also suggest you to feel the air, touch the leaves and listen to the surrounding sounds. Don’t worry about the ideas now, simply enjoy and live in the moment. Once you go back to the studio, start by painting whatever speaks to your soul, and watch as the room of inspiration opens before you.
Always remember, Inspiration from nature isn't about copying what you see; it's about feeling the experience it gives you.
Here are five ways I find my inspiration:
1. Immersing In Nearby Nature
Explore nature wherever you find it, whether it's a local park, your backyard garden, or a countryside stroll. I always sit and soak in the peaceful surroundings of my garden studio or visit my favourite garden in my neighbourhood, ‘Meanwhile Gardens’. This place saved my mental health during the pandemic and inspired my Spring Collection 2020—the first collection where I applied masking fluid in layers as I do know, an idea that originated during a visit to this garden!
 |
 |
| Check out the Meanwhile Garden, Spring Collection 2020. | Meanwhile Gardens |
2. Capturing Every Moment with Your Camera
As an artist, nature is my main inspiration. Thus, I click countless photos from various angles and directions, I capture the surrounding beauty – you never know what might inspire your creativity later on. Experimenting with different settings and taking photos at different times of day helps me discover new perspectives and ideas. Check out my Master Class No.1 where I discuss how these photos inspired me to create the watercolor monstera.
Putting together my selected photos to create a mood board is a fantastic way for me to explore unique color palettes and smooth my creative process.
 |
 |
| Mini monstera painting from my Master class No.1 | Photo of Monstera Leaf, exploring different angles |
3. Reflecting and Meditating
I find a quiet spot in nature to sit, reflect, and meditate. I allow my mind to be clear and my thoughts to flow freely, connecting with the surroundings at a deeper level. I make sure to be fully present in the moment, just as our minds use dreams during sleep to analyse the experiences we’ve had in the past. Continuous painting can drain both my energy and mind, so it's important for me to take breaks and simply relax, doing nothing at all.
Nature's beauty is both inspiration and relaxation, with every moment spent soaking it in.
4. Taking Notes
I am known for my non-sketching approach, but I always make sure to bring along my journal and pencils to scribble notes of interesting scenes or objects I come across. This allows me to observe and interpret the world uniquely. These serve as references or starting points for my future artworks, also helping me overcome creative blocks.
5. Creating Artwork
Once I return to my studio, I always take a moment to reflect on my experiences. When I feel ready, I start making art inspired by what I saw. I love experimenting with different materials and textures to develop my signature style. And you know what? I don't worry about making it perfect; I just start painting, and things always seem to fall into place. I let my imagination run wild and allow nature to guide me in finding my own artistic way. Plus, I've learned that it's okay to make mistakes – sometimes they lead to the most amazing discoveries!
You know, the best part about nature? It's the endless color inspiration it provides. From the soft hues of dawn to the rich tones of dusk, there's a whole spectrum of colors just waiting to be explored. I love embracing the dance of light and shadow and playing with different shades to add depth to my artwork. And you know what? It's this infinite palette of colors that keeps me inspired on my artistic journey.
As I wrap up, I just want to remind you: creativity is everywhere – we just have to open our eyes to it. So let's take a moment to soak it all in and let our ideas flow free!

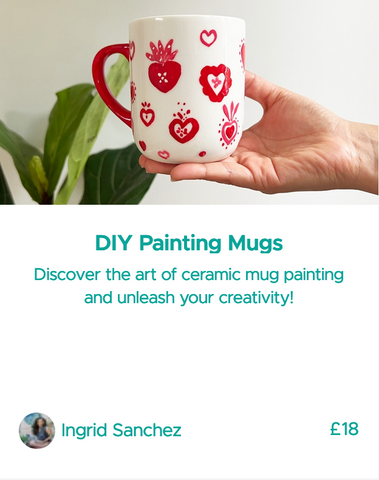
Online Watercolor Workshops with CreativeIngrid
The virtual classroom is open!

|
Three Master ClassesEach master class begins with a deep explanation about each art supply and is also conformed of several demos and projects. |
 |


Painting lights - Using values and layering with watercolors

One of the main qualities of watercolors is that by varying the amount of water and pigment that we use, the result can be very transparent or even opaque.
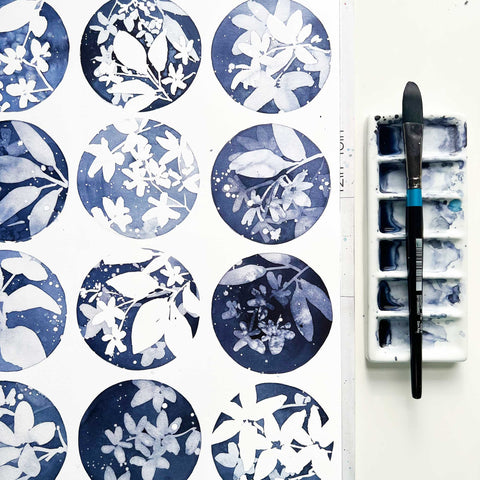
To practice transparency and color value in my book ‘DIY Watercolor Christmas’, I proposed a project called ‘Layering Circles’ (Photo 1). A wet on dry exercise where we can observe this quality while layering circles.
By using the same principle we can create the effect of light in a fun and simple way. I exemplify this with a string of lights (Photo 2), but I didn’t go trough the process. So I thought it will be handy to create a step-by-step tutorial.
 |
 |
| Layering Circles | String of lights |
The following tutorial is for a yellow light, but you can create lights in many colours. The key is always to work from light to dark, so don’t be afraid of using enough water to achieve this. You can only use one color if you want, although I propose using two for a more interesting effect.
I also created a quick video that can be found as a reel on mi IG account where I added a blue back ground just for fun. It is a more experimental approach where I also sparkle some salt for an additional texture.
For this project you will need:
- Watercolor paint
- Watercolor paper
- Pencil or watercolor pencil
- Brushes
Color palette
Lemon Yellow and Pyrole Orange
Step-by-Step
 |
 |
| 1. Paint a translucid yellow circle and let dry. | 2. Draw the light bulb using a watercolor pencil. |
 |
 |
| 3. Make a watery mix of Lemon Yellow and Pyrole Orange, and paint a second circle, slightly smaller than the first. Go around the light bulb in step 3 and 4, we want to reserve the original color. Allow to dry. | 4. Add more orange to your mix and paint a third smaller circle. |
 |
 |
| 5. Repeat this step if you wish with smaller circles, I painted a total of five circles. | 6. Leave the light bulb as is or add more color if you wish. I added more yellow and orange. Using a gray watercolor pencil, draw the base of the light bulb. |
 |
|
| 7. I drew some lines to resemble the idea of a strain. | 8. Try it using different colors! |
Video / Reel (TO BE UPLOADED TO MY IG ACCOUNT SOON)
For the group of lights with a blue background in the video I used:
Lemon Yellow, Cadmium Yellow Light, Pyrole Orange, Cobalt Teal, Ultramarine Blue, Cobalt Blue, Indigo.
NOTE: This tutorial is based in the projects of the book ‘DIY Watercolor Christmas’ by Ingrid Sanchez, AKA CreativeIngrid. Publisher: David & Charles (13 July 2021).* With thanks to Cass Art (UK) for providing the watercolors for testing them.

DIY: Christmas Ornaments - Paint on glass using Watercolor Ground

It’s that time of the year when we start thinking about Christmas decorations, and because I am all about handmade, I want to share one of my favorite projects from my book ‘DIY Watercolor Christmas’: the galaxy ornaments.
I love this project because it is also a cool way to experiment with Watercolor Ground, an absorbent primer that allows us to paint on many different surfaces such as paper, glass, wood, metal, fabric and plastic.
It is also interesting to observe how some texture techniques react differently than they do on paper. This is a fun and slightly messy activity that can be done with children.
 |
 |
Additional tips for applying watercolour ground
Some brands recommend sanding non-absorbent surfaces first, but I prefer to apply a coat of white acrylic paint instead.
After applying a coat of white acrylic and allowing it to dry, for best results you will need to apply two coats of watercolor ground, allowing for drying time in between coats. Once the second coat has been applied, allow it to cure for at least 24 hours before beginning to paint with your watercolors.
For this project you will need:
- Watercolor paint
- Glass ornaments
- White acrylic
- Watercolor ground
- Table salt
- Rubbing alcohol
- Brushes
- Toothbrush or brush with stiff bristles
- Spray bottle (optional)
Color palette
I use a mix of Prussian Blue, Indigo, Payne’s Grey, Ultramarine Blue, Cinnabar Red. To give each bauble its own personality, change the dominant blue for each one. Indigo and Payne’s Grey will result in an intense shade, and by adding a little Cinnabar Red to the mix we get a lovely purple.
NOTE: This video tutorial is based in the ‘Galaxy Ornament’ project of the book ‘DIY Watercolor Christmas’ by Ingrid Sanchez, AKA CreativeIngrid. Publisher : David & Charles (13 July 2021).

My experience writing ‘DIY Watercolor Christmas’
The dream of writing a book

|
|
Painting a Christmas Wreath for the project 'Traditional Wreath'. This is also the artwork used on the cover of 'DIY Watercolor Christmas', Ingrid Sanchez 2021. |
Writing a book in pandemic times
 |
 |
| Trying to capture the step-by-step process |
Painting glass baubles with a galaxy texture |
And I did it!
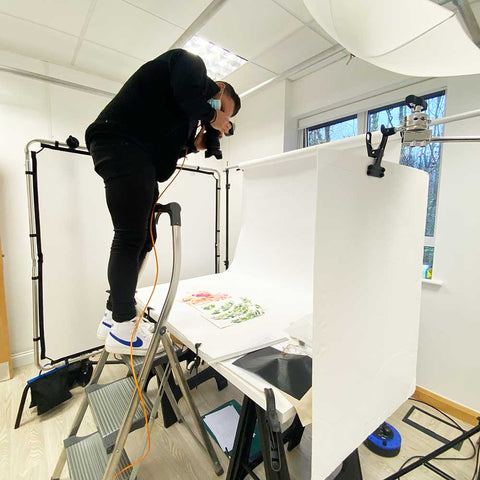 |
 |
| Photography session at David & Charles offices | Taking photos of my art supplies |
 |
 |
| Books for the pre-release |
Holding the first copy! |
I hope this book speaks to you and helps you discover a medium that has brought so much joy to my life. And of course it is a big plus if you love Christmas!
BUY A SIGNED COPY

Tips for painting with masking fluid and watercolours
If you know me, you know that I love working with masking fluid. I use this medium in almost all my paintings, and it is very common that people ask about it when seeing my videos on Instagram or YouTube.
Here are some of the most asked questions and some tips of how to use this medium without all the hassle of ruining your brushes or paper.
What is Masking Fluid?
Also know as liquid frisket, masking fluid is a water-based medium used to repel paint and preserve white areas on the paper. This technique is very handy to keep small or complex details that would be too difficult to paint around, but is also a great way to create unusual effects that would be impossible to do by hand.
What brushes do you use to apply Masking Fluid?
Short answer: (almost) all of them! I obviously go for the not so new ones and avoid really expensive brushes. Just please don’t buy cheap brushes to throw away after using them, there is no need of that.
We all know that masking fluid can ruin our brushes, but it is all about preparing them correctly. So here is the big secret: Soap.
How to prepare your brushes before dipping them in Masking Fluid?
Mix a teaspoon of liquid soap in a glass of water and soak your brushes in every time you add more masking fluid, this will also make it easier to apply. Wash your brushes with more soap and under running water immediately after you finish applying it.
What kind of soap?
I always use liquid dishwashing soap. Alternatively you can also use a bar soap, I’ve seen other artists doing this, but because my brushes are big it's easier to work with soapy water.
What brand do you use? My masking fluid is too thick to paint.
With some exceptions, almost all brands are equally thick, but by using the soapy water on your brush you will dilute it and make it easier to work. I recommend pouring your masking fluid in a small bowl or plate instead of dipping the brush in the bottle, you can always put it back into the bottle… yes, with soap and everything.
And if you still want to know the name of the brand, it is Schmincke blue masking fluid.
Why does my paper tears when I remove it?
There are different reasons that can cause this, but the most common one is that the quality of the paper is very low. Student grade paper and thin paper don't react well to masking fluid.
Another reason can be that the paper was wet when you applied it, or it was damp when you removed it.
What is the best way to remove the masking fluid?
It depends on the amount of masking fluid used. Small areas can be removed simply by rubbing with the fingertips or an eraser. For larger areas a stiff piece of cloth can be used, you can see how I do this in my process videos.
ONLINE WORKSHOP:Introduction to painting with masking fluid & watercolors (CreativeIngrid Style)
An online beginners friendly class where I explain step by step the process of layering with masking fluid and watercolor in my signature style. You will learn the fundamentals of working with masking fluid and how to avoid the most common mistakes. |
| ENROLL HERE! |
Important tips:– Work fast and never allow the masking fluid to dry on your brush.
– It is important to apply and remove the masking fluid when the paper is completely dry, if not it is easy to tear the paper when removing it. – Don't let the masking fluid more than a week, or it will get too difficult to remove and damage the paper. – Before removing the masking fluid I recommend using a humid paper towel to clean the excess of pigment accumulated, this way we avoid transferring color to the white areas. |
For more detailed information and a small demo can be found on the video below.
NEW ONLINE WORKSHOP:Painting with masking fluid, washes of watercolor, mixed media & textures |
 |
| An intermediate class where you will learn how to paint with layers of watercolor washes and masking fluid while exploring other mediums like acrylic inks and pigments. |
| ENROLL HERE! |

Can you make a living as an artist?
When you meet someone for the first time, there are some questions that one would expect. Given how jobs tend to define us as individuals, it is only natural that someone wants to know what you do for a living. But somehow I doubt that if you answer that you are a lawyer, the next question is ‘Do you have a second job?’ I have had so many funny conversations which start off with these two questions. It recently happened to me in a gallery where I was exhibiting and I felt like answering:
“Yes, I am a full time artist and don’t live on the street!”
 |
|
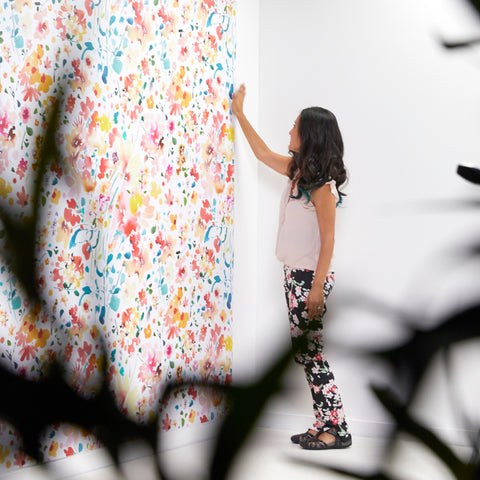
Interior design challenge for The Sunday Times, London 2019. |
Why do people assume that one cannot be an artist and enjoy a stable career? Of course, it is true that you need to work a lot (as with anything you want to be good at) and, especially at the beginning, you might need to generate additional sources of income. The difference is that art is fun and does not necessarily feel like work. But in a society that teaches you that only by suffering will you be successful, it can sometimes feel strange to other people.
It is not uncommon for me to get direct messages from young people on Instagram asking me whether it is possible, if I actually live from my art or I just post on IG as a hobby. A couple of other very common questions is what did I study and where.
In another post, I will be sharing the story of how everything started for me, but for now the important question is: Can you make a living as an artist? And the answer is yes, absolutely. But this does not happen overnight. You need to work hard on your skills, create something unique and be very proactive when it comes to learning and seeking new opportunities.
I wish there had been someone to answer this question when I was young and all I wanted to do was paint. The advice I received from my father was that I should study architecture and paint as a hobby. Of course, he was thinking of a career that gave me plenty of useful skills and a realist chance of finding a job.
I liked so many ‘artistic’ things at such an early age that I think my path was very clear from the beginning, but it got lost for a while because I did not realise all the cool things one can do as an artist. Luckily the internet now exists and you (future artist?) are reading this! If you wish you could paint, draw or make any kind of creative activity, all the while make a living from it, the following is for you.
Know that you don’t have to be in a gallery or museum to call yourself an artist. In fact you don’t have to call yourself an ‘artist’ to create whatever it is that you do. At the end of the day it is just a label, so don’t worry too much about it. A lot of people do not like it because it feels heavy but I personally love it!
There is no career that is going to teach you how to become an artist, everyone’s path is different. For example, I studied a Bachelor’s degree in Information Design and a Master’s in Publishing, so in fact I am a self taught artist. But studying a career and working in several office jobs has been very beneficial for multiple reasons:
- For years I worked in the publishing industry, where I learnt a lot about colour and production (super useful when I digitise my watercolours).
- Eventually I switched to a more fulfilling role as Brand Manager at a charity where I learnt about running a business with a very tight budget.
- I was able to build my own website and I never had the need to hire a designer.
- When I decided to become a full-time artist I was able to retain some previous clients until I did not need that extra income.
Do you want to be an artist? Before you do anything, work on your skills, look for workshops that will help you in specific areas, practice a lot and be original. When you do this, your voice as an artist will emerge and everything will fall into place at the right time.

Social media features, my Etsy experience
Social media features
The very first time I got a feature was through BuzzFeed in 2016 and from one day to the next my little floral watercolour was everywhere: Facebook, Instagram, Pinterest, without me having to do anything. I always mention this in my interviews as this was the key moment I realised the power of social media and decided to pursue this avenue to build my business.
Once in a while these kind of features happen, sometimes by surprise and other times I receive an email asking for my prior permission or even a contract or agreement to sign.
Something important to mention: I have never paid for these features. Legit accounts don’t ask for payment, so be careful if an account approaches you and wants to charge you. I have seen this being discussed on Facebook forums, apparently it is quite common on Instagram.
 |
 |
| In my kitchen. | Walking my neighbourhood. |
 |
 |
| Life in the studio. | With my husband in our favourite pub. |
About my Etsy experience
One morning I received an email from Etsy asking for my permission to use one of my moons on the post 'Obsessing Over: the Solar Eclipse' with one of my favourite themes: the moon!
Days later a second email followed asking me if I would be interested in being part of the Etsy blog where they talk about the life of artists that sell on Etsy. I said yes without hesitation and full of excitement, so we arranged a Skype call where I answered lots of questions, but I didn’t hear back from her for a while and I started to think that maybe I was not a good fit for what they were after.
Months later during my holidays in Mexico I received a very exciting email telling me that they were considering me for a special post about 'all things woman-made’ celebrating 'International Women's Day'. I replied to a questionnaire, sent some photos and I got a yes, you will be featured! And ‘ohh, by the way, are you still interested in that post we talked about a while ago?’
What!? I was already over the moon, but yes, of course it was a huge YES!
So I prepared a script for what a day in my life looks like and weeks later they introduced me via email to Inna Kostukovsky, the photographer they had chosen to work with me. And again, the wait… in case you did not know, I live in London and the chances of getting decent light can sometimes be very small. So three or four months later, the good weather finally arrived and we found a beautiful sunny day to meet at my home studio.
I do not like being photographed, so this was definitely a big challenge for me, but Inna was wonderful to work with and gave me lots of tips of how to look natural. We followed my list: meditation, coffee, painting, admin tasks, yoga break, etc… a long day!
I also took Inna to my favourite places: garden, lunch in my favourite place on Golborne Road, supplies shopping at Cass Art in High Street Kensington and finally a drink with my husband in my local pub. By the end of the day I was ok with the camera pointing at me, I felt like a celebrity (that no one knew!)
Weeks later Inna sent me a link with the photos and more weeks later Valerie sent the draft of the post called: 'A Day in the Life of CreativeIngrid', ohh happy post!

|
| 'Silver Moon', featured on Etsy blog. |
And then what?
As exciting as it is to be featured, the important part comes after. Every time has been different for me. The 2016 BuzzFeed experience basically put my Instagram account on the map and helped boost my social media presence.
Etsy is no exception, but each time the impact is different. Being on the ‘Editors picks’ results in a boost of sales, and this is the same with features. Instagram posts can bring more followers, but not necessarily more sales.
But I always try to look beyond the number of sales, I am talking about the exposure the different experiences bring. Don’t get me wrong, every time the ‘cha-ching’ sounds I make a happy dance, I still love it! And yes, of course artists want to sell, if not why do we have a shop, right?
I sometimes receive messages from art directors or companies looking for talent. Their requests can go from art collaboration, articles, interviews to things not related with my art at all! But thanks to these diverse opportunities my business has grown and diversified. Here are some examples:
- Calls to attend castings… one was for a shampoo commercial!
- Art collaboration with a local brewery
- A feature on Countryside magazine
- A gallery in California offering their space
- Harrods workshop for their employees (I did this one!)
- The BBC recently used my art in one of their programmes called DIY SOS
- I was invited to participate to an interior design challenge for The Sunday Times, it was so much fun!
What to do?
- Work hard and be patient. Note that from the time I received Etsy’s offer to the actual feature took more than a year. I do want to tell you the full story of my Etsy shop so you can understand the need for patience, but this will come in another post to make it easier to digest.
- Be prepared. When I was told that they were considering me for the Woman’s Day feature I was asked to answer a questionnaire and send a head shot within 24hrs. Though I was travelling in Mexico I luckily always have my iPad on me and photos on the cloud.
- Have your shop spot on. Good quality photos are key, do some research on SEO to improve your chances of being found and build a cohesive look… brand yourself!
- Be there. Check and answer your messages as soon as you can, you never know who is trying to get in touch. Plus this is also an important part of a good customer service.
- Be ready when it happens. When BuzzFeed featured me I was super ready for it. My Etsy shop was up and running, I had a website and I was working on my social media. This was the reason that I was able to monetise that boost, but also to show everyone what I had to offer.

15 common questions about my watercolour practice
As an introvert, I have found social media an amazing tool to promote my art. Instagram is kind of 'my thing' and I love it because it helps me connect with other artists and like-minded people. One thing I noticed is that very often people ask the same questions: What paper is that?, What is that 'blue thing'?, Do you paint on canvas?, so I thought I would answer all of these in one place, and this blog post was born! So here I go...
ABOUT MY SUPPLIES
1. What mediums do you use?
In general I use water based mediums, being my favourites watercolours and acrylics.
2. What are you painting on? Is that canvas? Is that a giant paper block?
I always paint on watercolour paper, it looks like that because I use a thick white wood board to stretch my paper.
3. Why is your board so thick?
Just because it is what I have at hand. The thickness is not important at all. In fact the wood boards I give to my students during my workshops are very thin and light. Sometimes, when I pant in a larger format I use an acrylic sheet and it also works very well for me.
4. How do you stretch your paper?
There are two techniques I use depending in the amount of water that I am going to use and the size of my painting. In one I use painters tape and in the second one gummed tape. I will write a tutorial soon.
5. What paper do you use?
I love working with Arches paper 300 or 185gms. The thickness that I use depends on the technique I use to stretch it, which also depends (again) in the amount of water I plan to use.
6. Do you work with cold or hot press paper?
It depends on the project I am working on. I love cold press (the one with texture), I prefer the experience of my process with it. But sometimes I also use hot press because it’s easier to digitise and it just make my life easier.
7. What is the ‘blue thing’? What is the paint that you remove and leaves white behind?
Ahhh! The magic of masking fluid, my favourite technique. It’s just a liquid that works as a resistance when it dries. It comes in white and blue colour, I like using it blue because it is easy to spot on the paper. I wrote a tutorial about how to use masking fluid here.
8. Where do you buy your supplies? What brushes do you use?
I buy them at CassArt where I am brand ambassador.
|
Painting on stretched paper over a wooden board. |

ABOUT MY PROCESS
9. Why do you paint on the floor?
Because of the size of the paper that I use, I find it easier to work on the floor where I can paint using my whole body instead that just my arms. I danced classical ballet for more than 10 years and I also trained to be a yoga teacher, so the connection with my body is an important practice for me.
10. Is not that bad for your back?
Its actually the opposite because I know what I am doing. When I am painting it’s a meditation in movement, I breathe and move very consciously. It’s not easy because I can paint for 4 or 5 hours in a row, so by the end I am exhausted and happy, like when you go to a very intense session in the gym. But remember that I trained as a ballerina for years and I’ve been practicing yoga for more than 8 years now. This is the reason I always call my painting sessions ‘Brush Dancing’.
11. Why are you barefoot? Why do you step on your paper? How do you keep your paper clean?
Being barefoot gives me the feeling of connection with the earth, but it’s also very handy so I can reach all the corners of the paper by stepping on it. My paper stays clean because everything around me is clean, my floor and obviously my foot. I also have a lot of practice so I kind of know what areas of the paper are still wet and I try not to step in there.
 |
 |
| My palette | In my studio (Etsy interview 2018, London). |
12. Where are you from?
I am a Mexican as all my family is and British because I have lived in the UK for a long time. I was born in Mexico where I lived until I was 24. Since then I’ve lived in Barcelona, London, NYC and I am back in London since 2016.
I consider myself a self taught artist because I started painting at a very young age, always playing and experimenting with what I had at hand. I only decided to make it my full time job after a year abroad in NYC (2015-6) where I purely focused in training myself and felt confident enough with my own voice.
- 2006 - Bachelor’s degree in Information Design in Mexico (UDLAP, Universidad de las Americas Puebla)
- 2008 - Master’s in Publishing in Barcelona (IDEC, Universitat Pompeu Fabra)
- 2015,16 - Various classes at The Art Students League of New York
I am a full time artist since 2016.
Being an independent artist is hard work. There is an idealistic idea that creatives have a life of chasing inspiration while travelling and drinking coffee, but the truth is that it is a job like any other.
There are so many things to do that you will be amazed of how little time one has to paint. There is painting (obviously), digitising and design, photography, social media, customer service, lots of administrative tasks and yes, I do all that by myself, no team unfortunately.
I hope this fast Q&A is somehow helpful, but if you have any more questions please leave them below and I will be happy to answer them. Thank you for reading.